Code, schematic, and PCB files
On this page:
User guide
Adding your own samples
MIDI implementation
Adding trigger inputs.
V15 (April 2020) Changes:
To enable and disable the click hold shift for ~4 seconds
To erase the current loop bank, Hold record then press and hold play for ~4 seconds. The light will turn off for a second to indicate it’s been cleared.
Output:
The output is mono but comes out as phased stereo when a stereo plug is in.
The tip of the jack is the signal and the signal is ground. The sleeve is unconnected.
This mean’s that when headphones are plugged in it sounds huge but when a mono plug is in it is just mono.
When connecting it to other gear always use a mono 1/8″ cable on the Bleep Drum end.
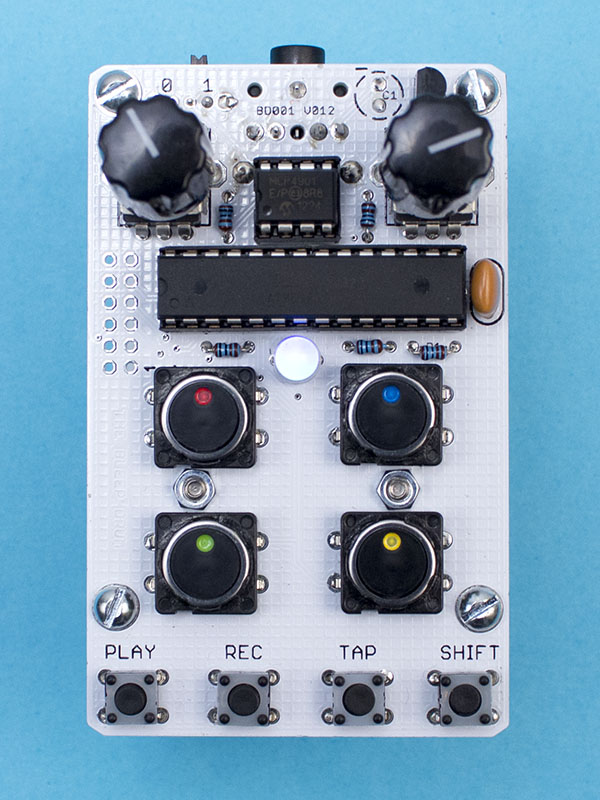
The left knob controls the pitch of the red pad, the snare.
Right knob controls the blue, tom pad.
Play – Stop and start playback of selected sequence. Light will blink white on the beat.
Record – Start and stop additive recording. Any pad played will be added to the sequence.
Light blinks red.
Tap – Tap tempo
Shift + pad = Change to that color sequence. Light will change to that color.
Shift + tap + right knob = Change tempo with knob.
Shift + Play = Reverses samples
Play + Record = Erase current sequence.
NOISE MODE 30XX
Hold shift while turning on the device. The light will turn green. Hitting shift again will turn it pink and blinky
Green – Pots control the pitch just like normal
Pink – Pots control noise.
All other controls are the same.
MIDI Implementation
Some DAWs might start on a different C0. If your device isn’t responding to these notes, try an octave up.
Trigger Note – Pitch CC – Pad
C3 – 70 – red tick
D3 – 71 – blue tom
E3 – 72 – clap green
F3 – 73 – yellow kick
G3 – toggle play
A3 – Reverse toggle
Bb3 – Noise toggle. In noise the four ccs change different variables.
C4 – Select blue sequence
D4 – Select yellow sequence
E4 – Select red sequence
F4 – Select green sequence
MIDI channel select:
with the device off, hold one of the pads down to select a midi channel.
If no pads are held down during power on the Bleep Drum will receive on all MIDI channels.
Red = 1
Blue = 2
Green = 3
Yellow = 4
Importing samples
The Bleep Drum has about 20 kilobytes of space for samples available in the program memory. That’s about 2 seconds at the ~10kHz sample rate. That might not sounds like much but it’s enough for the four pads on the Bleep Drum.
Here’s a guide for adding your own samples:
1.
Download the code. You jsut want the V15 folder. There’s a file called samples.h in there that has arrays nameed “kick”, “tick”, “snare”, and “bass”.
Here’s kick.
PROGMEM prog_char kick_table[] =

{

127,127,128,(.....ssssssamplessss.....) 128,128,128,128

};

int kick_length=5744;
You’ll be wanting to replace the bytes in the table with your sample and change the length to match the number of bytes.
2.
Audacity is a great program to do the wav manipulation in.
Get your mono sample cropped as small as you can, making sure to start at zero and having a very quick fade out at the end to reduce pops.
Resample the sound at 10HGkz (edit>resample) and change the the format to 16b PCM (click on the header of the track).
Once it’s ready go to Tools > Sample data export. Bes ure to have it output the entire length of the file
3
Now you need to turn that unformatted pile of numbers into something useful.
Open the text file in a spreadsheet program with tab as the separator.
Use this spreadsheet as an example on how to turn the floats into bytes.
Make a note of how many bytes there are.
4
You’ll need to make that last column formatted like this:
130,134,136,136,136,134,133,130,129...........
You can do this by saving it as a separate .csv or copying it into a text editor that can search for regular expressions and replacing “/n” with “,”.
5
Now you can copy those commas separated bytes into the tables and change the length value.
If the sketch won’t compile you’re probably over the program space. Try removing strings of small numbers (127 is the middle value so it’s “0”. So you could remove something like …..128,129,127,128,127) from the beginning or end of your samples if you need to shave off a few bytes.
Yes I’ve been meaning to make a page that could do this for like 6 years.
A simple circuit can be built to allow modular trigger signals to activate the Bleep Drum’s sounds.
Signals can’t be sent to these pads directly as signals over 5V would damage the chip. The signals also need to be inverted to activate the sounds correctly.
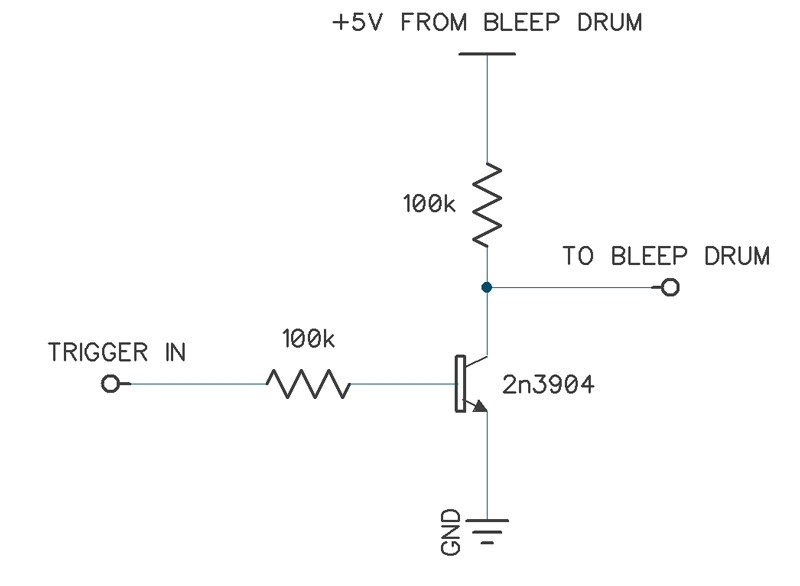
This circuit can be built with any resistors from 20k to around 200k but if you’re having issues try it as shown. Andy general purpose NPN transistor should work.
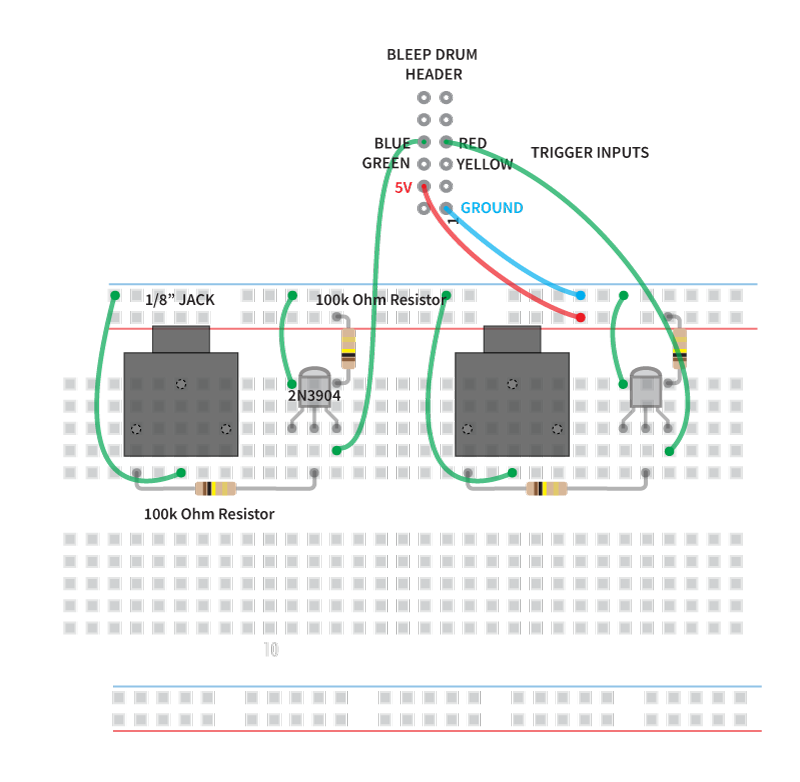
Here’s an example of how to build two on a breadboard as seen in this video. Here’s a guide on getting started with breadboards.
You can solder wires directly to the header but it’s best to solder some header pins so the long sides are sticking out the bottom of the board. Then you can connect them to a breadboard with female to male hookup wires.
Bleep Drum header:
1 – Ground
2 – Tempo output (high pulse every 1/8th)
3 – Not used
4 – +5V
5 – Trigger yellow
6 – Trigger green
7 – Trigger red
8 – Trigger blue
9 – TX
10 – RX (MIDI in)
11 – +9V (Straight from battery)
12 – Reset