Intro
The Delaydelus is a sampler with a built in delay.
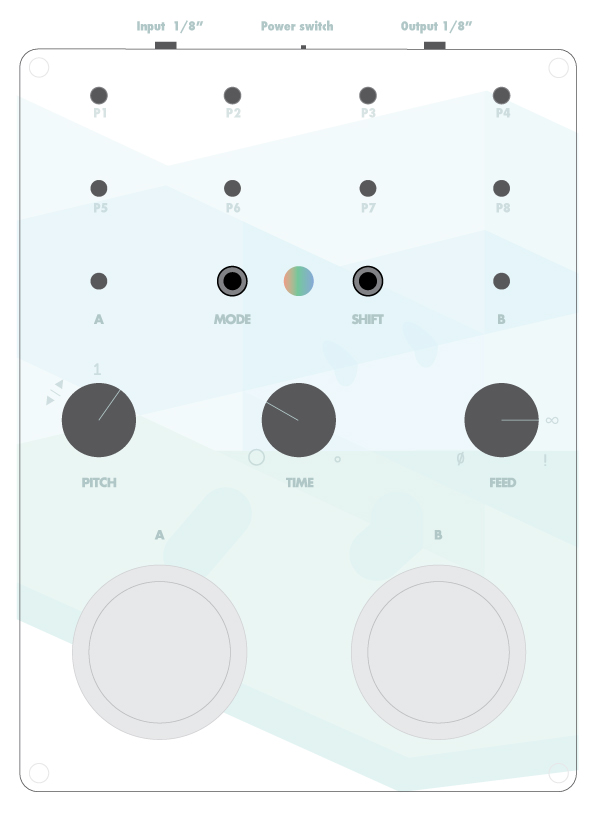
Each pin is a sample. The buttons are used to trigger whatever pin is connected to that buttons pin.
For example if the first pin, P1, is connected with the alligator clip wire to pin “A”, the A button on the left will play that sample.
If P1 is connected to P2 and A1 then the A button will play both samples at the same time.
Up to four samples can be triggered at once.
Pitch is adjusted with the knob on the left. When it’s at 12 o’clock the sample pays back at normal speed. As you go counter-clockwise from there the playback will go slower until it starts going in reverse.
Turning the knob clockwise from the center will increase the playback rate.
It’s powered by a 9v battery that’s inserted from the side.
The audio input and output are 1/8″ mono.
Delay
The internal delay is controlled with two knobs.
The middle knob controls how long the delay is, from just a few microseconds at full clockwise to about a second at full counter-clockwise.
The feedback amount is controlled by the right knob. When the knob is all the way counter-clockwise the delay is off. As you turn clockwise the feedback increases. At 3 o’clock the feedback is infinite. Past that it’s amplified and starts to go crazy.
When the device is in the blue, playback mode the shift button acts as a tap tempo.
Modes
The mode button steps through the four modes, indicated by the color of the LED in the middle, in this order:
Blue Mode – Play
This is the default mode the device starts with when turned on. Connect a sample pin to a button pin to play that sample.
Hold shift and hit a button to lock a button and keep the sample looping. Hit shift or the button again to stop it.
Green Mode – Mod
This mode can be used to trigger and amplitude modulate the samples. Hit shift to toggle between the two methods.
In trigger mode the samples connected to the A pin are played whenever the input signal goes from low to high quickly. You can use
any type of CV trigger signal from a modular or synth (15V max) for straight forward triggering or try it with audio signals for interesting results.
In AM mode the input signal is combined with all samples being played.
Red Mode- Record
This is how you record your own samples. You will not be overwriting a default sample, just replacing it on the selected pin.
Step 1 –
Select the pin you’d like to record to by connecting it to the A pin. Remove all other wires.
Step 2 –
Hold the shift button down for 1 second. The light will begin to blink yellow.
This is warning you that you are about to erase the existing user sample on this pin. (The default Daedelus sample cannot be erased).
Release the shift button and press it again to erase this pin and ready it for recording.
Step 3 –
You will now hear the audio from the input jack. The left most knob will control its volume.
There is some inherent noise since it’s a crunch 12 bit monster but you can can keep it under control by not going past around 11:00.
Turn the volume knob between 9:00 and 10:00 and adjust the volume of the device your are recording until you can hear it about to clip.
You’re not trying to get the input as loud as possible. A phone all the way turned up should be set around 10:00. If it’s up too loud there won’t be any overhead for the delay and other samples.
Hold the A button down to record up to 4 seconds of audio.
When you let go the device will go back to blue play mode and the sample will be on that pin.
Revert –
To switch back and forth between the Daedelus and user sample on any pin:
1 – Go to the red, record mode
2 – Connect the pin you want to revert to pin “A”, the left button pin.
3 – Hold down both the A and B buttons for 2 seconds.
The device will go back to play mode and the default sample will be selected. Do this again to go back to the user sample.
Purple mode- Through
In this mode the samples will not be accessible but the audio coming into the device will be affected by the delay.
By default the input audio will be muted when you hit the left button. You can change this to the opposite by pressing the shift button.
The left knob controls input amplitude.
There is some inherent noise since it’s a crunch 12 bit monster but you can can keep it under control by not going past around 11:00.
Turn the volume knob between 9:00 and 10:00 and adjust the volume of the device your are recording until you can hear it about to clip.
See the green mode video above for usage instructions.
Samples
P1 – Kick
P2 – Clap
P3 – “Oooh”
P4 – “Beats”
P5 – Bed Spring
P6 – Lion
P7 – Ray Gun
P8 – Air Horn
Mods
The Delaydelus was designed using the Teensy 3.1 and can be programmed using the Arduino IDE with our USB adapter. All you need to do is install the Teesnyduino and select Teesny 3.1 as your target board.
You can find the code and schematics here.
You can also use the USB adapter to send MIDI data to the device (implementation info below).
MIDI implementation & USB Adapter
USB MIDI can be added with the USB adapter.
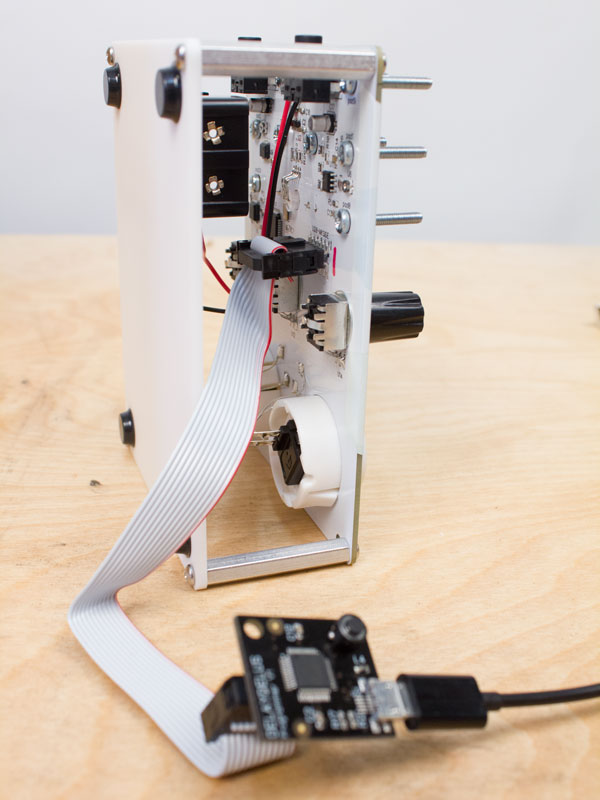
Attach the adapter with the red line out.

The adapter powers the device whether the power switch is on or not. Turn the power switch off if you have a battery installed.
The Delaydelus will show up as “Teensy MIDI” in your MIDI software
Note Number – Action
31 to 38 – Trigger Pin 1-8
39 to 47 – User samples 1-8
CC10 – Pitch
CC11 – Delay length
CC12 – Delay feedback
If you aren’t getting any response from those MIDI numbers try and octave up or down. Some software starts counting MIDI note 0 in a different place.
Code and reprogramming
Delaydelus code and schematics.
The Delaydelus is built around the Teensy 3.1 so you can program it in the same way.
1. Install the necessary libraries.
Download the S25FLx_FIFO zip. In the Arduino IDE click sketch>include library>add zip library.
Bounce 2 should be included with your Arduino install but if not install it buy selecting sketch>include library>library manager and searching fro “bounce2”
2. Install Teensydunio.
3. Download the most recent Delaydelus code. unzip it and in the code director open “delaydelus_v27.ino”
4. Select tools>Board>Teesny 3.1. Select tools>usb type>MIDI
5.Connect the USB adapter to the Delaydelus and hit upload.
Volume controls
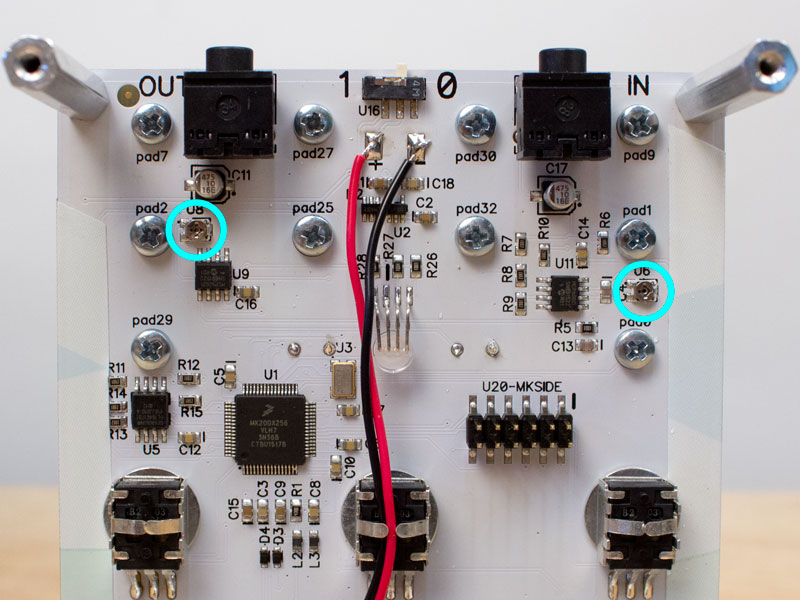
There are two trimmers on the bottom of the board that can be used to adjust the input and output gain.
It’s best to keep them at the default settings but if you have trouble with the levels you can carefully adjust them with a small screwdriver.

If the device is too quiet use a small screwdriver to adjust the trim pot on the left.
If the input gain is too high and you have a lot of high pitched noise when sampling turn the trimmer on the right down.

